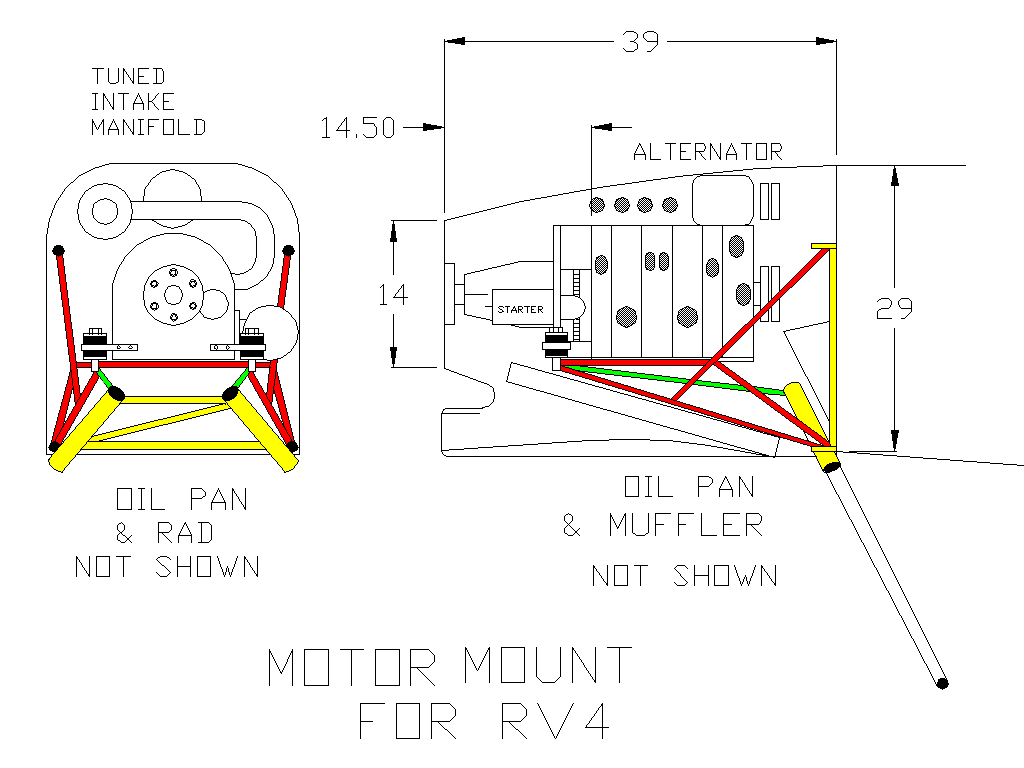
This is the bird cage approach made with a whole bunch of 1/2
diameter .049 wall tubes. It is less complicated than  it looks.
Make a 1/4 scale balsa model to prove to yourself that it
will be rigid.

The rubber bushings are on the engine/psru/prop/
alternator/starter CG so the rear mount is trivial.
Little to no load back there.

The red tubes are the motor mount tubes proper. The green tubes
are necessary to insure the integrity of the RV4 landing gear.
If the transverse green tube is not installed the landing gear will
tend to spread the motor mount tubes. The fore and aft green
tubes feed the landing gear loads into the motor mount.

The new tandem RV's are much simpler with a bent aluminum gear.
A lot of this stuff would be unnecessary.

A custom oil pan must be made to fit inside the bird cage.

When you use a pointy cowl like this kind of motor mount that implies
The mufflers are a problem. Perhaps Mike Wills twin
side mufflers will work fine. Lets keep our fingers
crossed. Here is a picture of Mike's mufflers.

Looks like Mike's engine is a bit further forward than shown
on this sketch. His rubber mounts are aft of the engine/psru/prop/
alternator/starter CG. This picture should also help you to visualize
this motor mount design.

Paul Lamar
OPS! I forgot a tube. I also added a bit of detail because now I can :-)

BTW this mount uses the Tracy trick of the oil foam separator sandwich plate
extended and thickened into a motor mount. We got to give credit where
credit is
due. A bit heavy as it is about 144 square inches by 1/4 inch thick
at a volume of 36 cubic inches and 3.6 pounds not counting a few
little holes. It is necessary and would be about one pound in any event.
Could be welded in as part of the custom pan of course.

BTW Mike Wills mount would work well and would be simpler than this one
IMHO if another hard point was constructed at the very top of the
firewall to brace the rear motor mount vertically. This one on the
other hand gives a bit more clearance around the water pump plumbing.

The extreme forward PSRU/motor-mount plate type mount would also work
with this scheme. That would give a bit more room for the front
of the pan.

Let me know if anyone wants this ACAD 12 drawing file.

Paul Lamar
Paul,

  If you start with Vans conical mount and cut away what's not needed (as
Tracy and I did) then all the landing gear support structure is taken care
of. The green tubes shown in your drawing are already there (I guess great
minds think alike!).

  When I made my mount I used the original mount points on the 13B block,
mostly because I wanted to retain the stock oil pan. But after I got the
rad mounted I decided to make a new pan because the stock pan interfered
with the duct. So in hindsight if doing it over I would put the rubber
mounts where you have them. I would build an aluminum oil pan with a
crosspiece of aluminum U channel integrated into the pan at the flywheel
end of the engine to pick up the rubber mounts. Hindsight is great isnt it? :-)

Mike Wills
Yes it is and I have learned a lot from the way you did it. I figured out
today how to eliminate a few more tubes and will have a drawing on that
later.

Also the water pump intake neck gets in the way of most RV4
motor mounts so this is my recommended modification. The way it is now
it comes down and out about three inches beyond the maximum width of the
engine. This interferes with the optimum placement of the motor mount
tube. By cutting it on the red line and rotating the neck about
45%  CW it will then come down and back giving more room for the critical
motor mount tube. You could also weld on an AN-20 fitting or an elbow
for a wiggins fitting instead.

Moving the bottom of the motor mount tube a bit forward, from that shown in
my drawing, approximately right under the intake port in the rear (front in
the car) end housing, will then reduce the stress on the motor mount tube truss.

Paul Lamar
Just like making parts I need to make three or half a dozen drawings
until I get one that I am entirely satisfied with. Here is the latest.
I was able to squeeze in a 5.5 inch diameter tangential muffler.
The exhaust pipe is intended to come out the side but is not
shown on this drawing.

The yellow tubes are existing Van's motor mount tubes. The red tubes are the motor
mount proper while the green tubes need to be added to stabilize the landing
gear. They serve double duty in this configuration as they also stabilize
the motor mount laterally.

The rubber bushing brackets are now attached to the motor/psru  plate and raised
slightly. There is a 1/2 inch cross tube just under the motor plate and just above
the rad. The rad is still in the same position as it was in the last drawing
and it is intended to be 12 inches wide. Custom oil pan required of course.

Also the water  pump intake neck must be modified according to the last message
on this subject. This configuration gives somewhat less stress in the
motor mount tubes. Small gussets would be called for almost every where.

Paul Lamar

The AirCraft Rotary Engine NewsLetter.              Powered by Linux.
ACRE NL web site.
http://home.earthlink.net/~rotaryeng/            http://www.linux.org