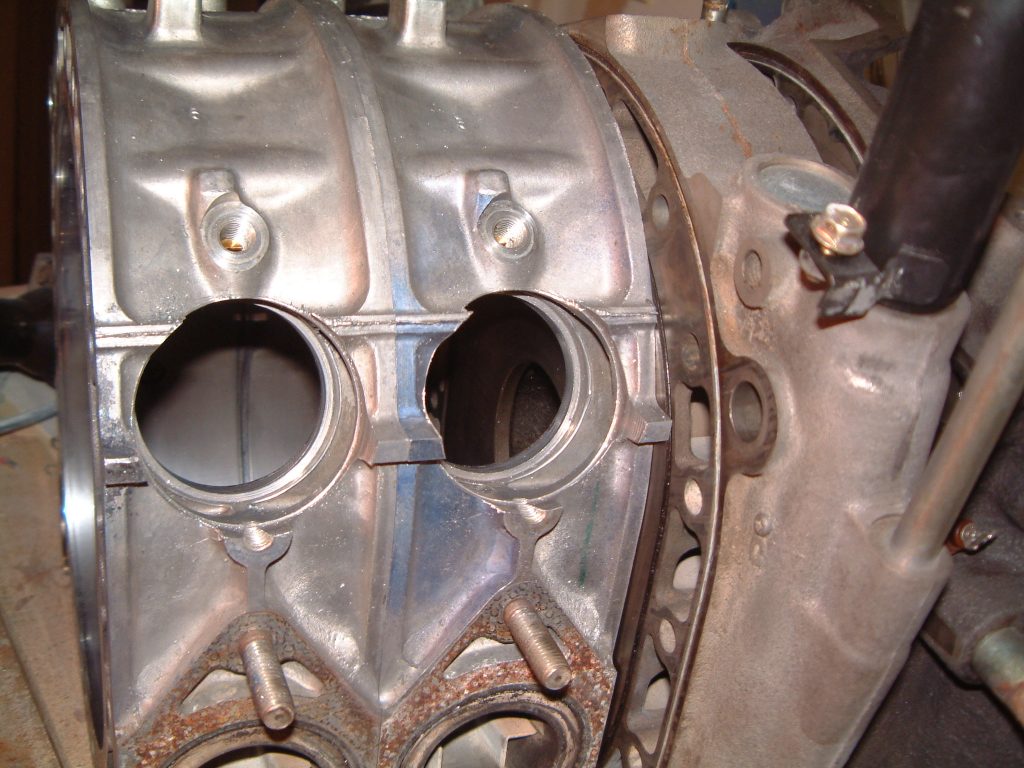
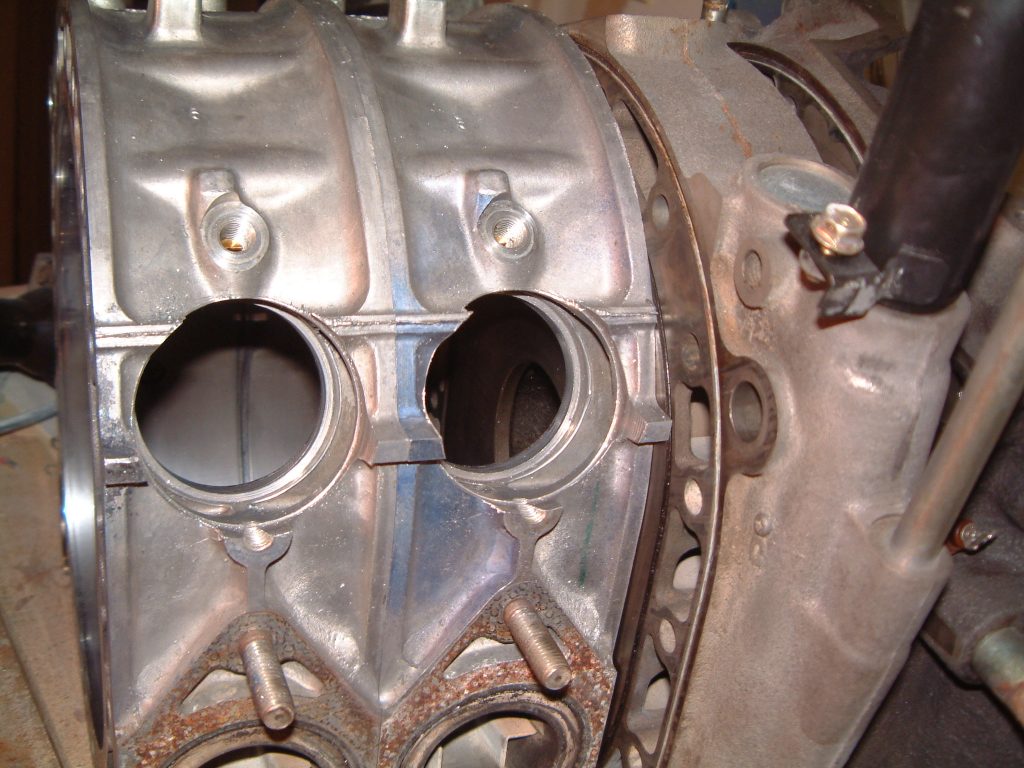
> >> I'm pursuing it - I finished boring rotor housings last weekend.
> Hopefully
> >> I'll have tubes in and the slide throttle done by next week. If that
> all
> >> goes well and the housings still look good - I'll order a complete
> rebuild
> >> kit and put it all together the week after that.
> >>
> >> Since the 13B in my airplane is waiting for a re-built exhaust system
> to
> >> replace the one that cracked off - I've got time on my hands and
> figured I
> >> go ahead and take a shot a rebuilding this second 13B into a P-Port.
> >>
> >> Thanx,
> >> Joe Hull
> >> Cozy Mk-IV N31CZ (65 hrs - Rotary 13B NA)
> >> Redmond (Seattle), Washington
> >>
> >>
> >> Congratulations Joe. Since you are already flying and all
> >> you need do is swap out the engine, I think you will be
> >> the first true homebuilder to fly a p-port of your own build
> >> since Everett Hatch. There are going to be a lot of
> >> envious RV'ers your neck of the woods as you flash past
> >> them in the sky.
> >>
> >> It was easy wasn't it? Hey, got any pictures of the boring
> >> process? Here are a few picturs of Joes airplane for the
> >> new guys.
> >>
> >> Where did the exhaust crack Joe?
> >>
> >> Paul Lamar ...No rotor no motor.
> >
> > Pictures - Nope! I was going to take pics but forgot the camera. My
> friend
> > has a huge Cleveland milling machine in his shop and tons of different
> > cutters. So I started off with a 1/2" face cutter to flatten the area
-
> i.e.
> > the knob where the manifold stud sticks out. Then I bored
progressively
> > larger holes with three drills and then used what-cha-ma-call-its (big
> > cutters with blades on the face and the sides) to cut 3 stepped holes
2
> 1/8,
> > 2 3/16, and 2 7/32. I wanted a notch in the inner face and another in
> the
> > outer face to seat the tubes and provide another barrier to water
leaks
> -
> > the 2 1/8 hole goes all the way through. The tube I'm using is 2" OD x
> 1/4"
> > wall.
> >
> > Next I'll turn the tube to match the steps and also a little lip on
the
> > outside edge to help capture the rubber tube that will join the
manifold
> to
> > the P-Ports.
> >
> > Exhaust - I was on my way to OSH and about an hour east of Cheyenne,
> > Wyoming, over Nebraska when I felt a slight change in the vibration of
> the
> > airplane. All the temps, pressures and RPM were fine - just a slight
> change
> > in the vibration. So I figured I better get on the ground and see what
> was
> > up. I landed at a little ranching town (population 267) with a 4000ft
> runway
> > (since I need lots of runway to land) and after landing and running up
> the
> > engine - the engine quit DEAD. The paint on the cowling started to
> bubble
> > and burn - not good. I pulled the cowling and found that the big tube
> of
> > the tangential muffler had broken off both of the 2" runners that come
> off
> > the exhaust flange. The hot exhaust had melted the wires together to
> the
> > injectors and other wires in that area - that's why the engine quit.
> >
> > Fortunately this little town had a great welder - and even on Sunday
> > afternoon he welded it back together. I pealed the injector and other
> wires
> > apart and wrapped them all up in electrical tape and silicone rubber
> tape
> > and took off for home the next morning.
> >
> > I'm abandoning the tangential muffler and inconel - too prone to
cracks
> > (this is my second) and am going with .049" 321 stainless tubes. The
> noise
> > will be higher but so will HP (I'll also have way less back pressure)
-
> and
> > hopefully more reliability too!
> >
> > Joe Hull
> > Cozy Mk-IV N31CZ (65 hrs - Rotary 13B NA)
> > Redmond (Seattle), Washington
> >
> > Thanks for the report Joe.
> > That is interesting. Who welded up the failed rig?
> > This is the second pusher rotary engine muffler failure
> > we have heard of. Many people make the mistake of welding
> > the tubes to the exhaust flange on the outside of the flange rather
> > than the inside of the flange. There is vibration causing
> > fatigue due to the mass of the large muffler cantilevered off
> > the tubes. The weight of the muffler can must be supported by a strap
> > to the engine and not just by the tubes.
> >
> > This was discussed on Mark Wrathal's best practices web site which
> > is linked to the ACRE NL site. Everybody building an airplane please
> > read this site. http://www.wankel.org/
> >
> > Also check out http://www.rotaryeng.net/interesting.html
> >
> > Too bad I did not know about it sooner Joe. Sorry.
> >
> > Paul Lamar ...No rotor no motor.
> >
>
> Hello Joe,
>
> Could you clarify the ID dimension of the your P-Port pipe?
> You wrote ....."the 2 1/8 hole goes all the way through. The tube I'm
> using
> is 2" OD x 1/4". Maybe you meant 2"ID?
>
>
> Thanks
>
> DougFir
>
I've got 2"ID tubes with .25" wall - so the overall OD is 2.5". I'll turn
the tubes down to fit the holes. I also wanted thick walled tube so I can
cut some sealing notches around the circumference in the water jacket area
and can pack those notches with JB Weld. I want to make it as difficult as
possible for water to get out!
I also figured I would start with 2" OD because it would be easy so reduce
the volume later if I found that 2" was too much. I can always slip
another
tube inside the 2" OD tube and pin it to reduce the volume - without
taking
the engine apart.
Joe Hull
Cozy Mk-IV N31CZ (65 hrs - Rotary 13B NA)
Redmond (Seattle), Washington
--------------------------------------------------
Joe, Why the edge of the aluminum tube in the wear surface?
I used 2 inch OD .065 wall but the hole through the steel liner
was only 1.875". That left a counter bore that prevented
the square cut aluminum tube from going all the way in and becoming
part of the wear surface. This left a slight gap which was blue taped
over from the inside of the runner when potting.
See the first and second attachments.
We filled it with white, high buck high temp epoxy initially.
Despite a mistake mixing the high temp epoxy,
which left it soft after "cure", it still did not leak coolant
when it was running on the dyno. We know as we had the slide
throttle off and on a couple of times.
Mark disassembled the engine, after a few hours on the dyno and
storing it over the winter, for an unrelated reason and found
the soft epoxy. Again no sign of leaking coolant around the joint
when I saw it. I dug the bad white epoxy out and replaced it with
gray JB Weld.
I am not saying your way won't work. I just wonder what
will happen over time as the apex seal passes over the aluminum
area in the liner area. It will be insteresting.
--
Paul Lamar ...No rotor no motor.
Aluminum wear surface<<<
My understanding from looking at the racing P-Ports is that you want a nice
rounded edge on the interior edge of the housing. So, once you create a nice
radius on the inside edge, I'm not sure it matters where the aluminum tube
ends up. The apex seals will never get close to the aluminum. Of course
there is a big expanse where the seals are unsupported - it would be
interesting to speculate what that will do to the seal - i.e. dragging on
the rotor then no drag...
By the time my tubes get to the inner housing they will only have .0625"
walls and all of that will be rounded away from the steel liner.
Attached is a picture of the bored housings.
Joe Hull
Cozy Mk-IV N31CZ (65 hrs - Rotary 13B NA)
Redmond (Seattle), Washington
--------------------------------------------------------
Ok I guess that will work. A chamfer will also work I guess.
I think it a bit less work to cut the end of the
tube off square and let it bottom on the counter bore.
All the way through you have to tailor the end of
the tube to match the curve in the wear surface.
To each his own :)
Paul Lamar ...No rotor no motor.
The Rotary Engine NewsLetter. Powered by Linux.
ACRE NL web site.
http://www.rotaryeng.net
Copyright 1998-2006 All world wide rights reserved.