I just spent some time looking on the internet for negative
comments
about JB Weld. I did not find any. One testimonial, a guy
repaired
a gouged cylinder wall and ran the engine for several hundred
hours. Tear down showed no change or deterioration in the JB
Weld. Also, JB weld claims the product is good to 500 degrees.
Based on what I have learned today, I think my skepticism
about JB
Weld was misplaced. Jerry
Jerry,
If your considering manufacturing P-ports, you might consider
a slightly
tapered shrink fit of the tube within the housing with some
high temp epoxy
to take up and imperfections in the machining.i.e. heat-up
the housing and
freeze the tube - his would take some experimentation to
find the most
suitable size whereby you can still get the tube inside the
housing and this
would all need to be done on a CNC for the accuracy needed.
This would be the most ideal method of sealing, but how
practical it would
be I'm unsure!
Just a suggestion, as it's something I'm considering..
George ( down under)
Hi George;
I did my Pports as you are suggesting with the inserts all the way
through with
match tapered (smaller towards the inside of the housing)
insert and
bored hole
and an interference (hot rotor-cold insert) press fit with
epoxy on the
prepared insert
bored hole.
One advantage is that it should never fall into the engine.
One disadvantage is that the 2" ID is rounded to 2.125" on the
rotor
surface - I am
not too concerned about the slightly reduced apex seal support
as the
edges are
beveled to soften the apex seal landing back onto the rotor
surface.
This measuring and fitting took significantly longer by hand
using a
basic mill, lathe,
digitial calipers and sandpaper...and lots of measurements.
The interference can be figured out easily enough looking up the
material and
temperature differential you plan to use between the
housings and inserts.
One press fit did take a little more convincing with a mallet
and wood
block ;)
I machined the inserts as well, finding the correct sized
tubing could
save a lot of work.
Without starting an epoxy war...
One of my biggest concerns is the ability of any epoxy to bond to
aluminum with less than Boeing processes.
Any bond can fail for a variety of reasons - poor surface
prep, surface
contamination, poor epoxy prep,
differential thermal expansion at temp, chemical resistance,
vibration,
thermal stability at higher temp (say 300F),
epoxy cure shrinkage, and for northern residents -
differential thermal
shrinkage over the winter months.
In any case, some sort of mechanical assistance/backup to the
epoxy is
not a bad idea - threading, brazing,
welding, press fit, pins, extra mechanical bond area
(grooves, etc...)
to insure the insert does not fall into the
engine catastrophically without warning. A leak would be
annoying, but
hopefully less dramatic and with warnings...
Take a look at an interesting article by Bill Husa regarding
bonding:
http://www.oriontechnologies.net/Documents/bonding.pdf
To summarize - sanding the aluminum surface with epoxy already
on the
surface may help adhesion by removing
and preventing the oxide layer from reforming.
Cheers
Cary
Cary,
I was thinking of a slight taper on both ends with the tube being
mechanically locked into position and the thin high temp epoxy
only being a
( surface imperfections) void filler, in the tapers and of
course the water
cavity.
This would be extremely difficult to do as your measurements
would need to
be exact AND you would get only one go at it.
The benefit would be that you would never have to worry about
the tube
moving either way.
I have looked at the threaded inserts, as done by X-Treme
Rotaries, but
others suggested that it wasn't optimum.
Is nothing ever easy!!
George ( down under)
Hi George,
I had the same anxiety you and Doug have in the "research" phase.
When doing interference press fits you are pretty much committed
once
you start ;)
-stop early or keep going...
Removal of AL-AL press fits will cause some spalling? damage
and require
a larger insert.
Measure lots, machine under-oversize and finish with 400 grit
sandpaper
if you like.
Give yourself some margin based on temperature for the
interference fit.
Not hard to do - just time consuming. The epoxy will fill any
imperfections anyway.
Again, practice on a junk housing or whatever to verify your
plan will
work and gain confidence.
Decide what you want and Just do it!
Cary
I installed my first two p port inserts which had a tight sliding
fit but I could get them in and out with effort. These inserts went
all the way through the housing. They were turned out of 2.5 o.d.
stock because i needed sufficient material to install the butterfly.
So a collar was left that rested on the outside of the housing. A
similar design could be used with the slide throttle inserts. I also
grooved the insert for mechanical lock and used a high buck epoxy
that flowed out about the consistency of motor oil and took a whole
day to set. It is used for "high performance bonding" by NASA and the
aerospace industry according the manufacturers claims. I think the
simple 2" o.d. tube may be too simple. Also, I am getting over my
original enthusiasm for the stepped bore. I am not ready to give
upon it yet, but it has some major disadvantages when compared with
the all the way through insert: 1) roughly 50 per sent less contact
area with the epoxy and 2) a big hole to fill. The red you see on
the inset was trimmed after it was glued in. But I think I would
remove the material before next time. Jerry
If you pressure test the simple tube P-port system before you
assemble the engine no problem. Leaks, if any, can be fixed. All
other techniques are over kill due to the high strength of JB Weld.
The low viscosity epoxy is nice but expensive and harder to
work with than JB Weld. Heat the tubes of JB Weld in boiling
water to lower the viscosity before mixing it. That was mentioned
from the get go. The hole is easily blocked with masking
tape before pouring the JB Weld in the rotor housing.
I don't recommend the butterfly valves as they cause aerodynamic
losses in the intake tubes and a 1.875 inner tube diameter
is recommended.
On the other hand... are you willing to install the P-port tubes
in engines for people using your techniques Jerry?
If so how much would you charge?
Paul Lamar
Paul, I am not advocating returning to the butterfly. I think the
slide throttle is a better solution. Particularly if someone starts
making them for sale. I do have some concerns about the stepped
bore that may disappear as we have more time with it or maybe it will
turn out that full 2" bore is better. I will do it either way.
Whatever the buyer wants. The charge for boring the housing is
$100.00 ea, stepped or full. If the stepped bore is chosen the
insert is just a piece of tubing that requires no machining, or, at
most, one might want a couple of shallow grooves for mechanical lock
as you have stated. In the case of the full bore version, machining
the insert from heavier stock is probably required but is not a big
deal. The customer may want to glue the inserts in himself but if
I do it, I will use Duralco 4525. I have confidence in it. It may
be that JB Weld is more than good enough but I want to stick to one
product that I can develop technique for.
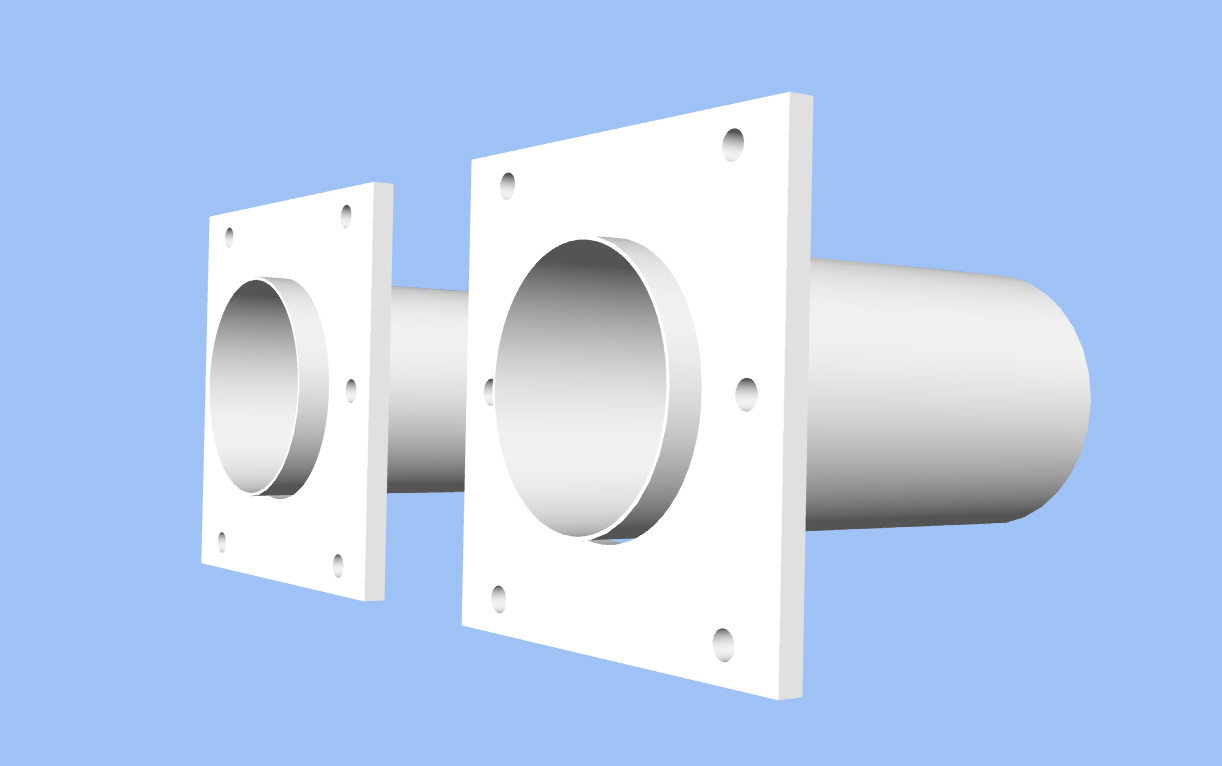
I don't know how you attached the slide throttle flange to the
insert but if it is welded that is not something I can do unless the
flange is .125" thick or less. This is a self imposed limitation. I
don't like welding near the limits of the welder (Miller SyncroMatic
200) which, BTW, lost the transformer the very first time I welded
above 130 amps. Turns out the nut on the lug between the power
supply and transformer was not tightened down at assembly. It is
still at the repair shop. Jerry
The flanges are .187" and you would be welding them to .065.
Not a lot of mass there and you could pre heat the works in
an oven to 500 F.
Paul Lamar ...No rotor no motor..
That is no harder than two pieces of .125. Is the weld
continuous, stiched? Jerry
You could stitch weld it. It must be sealed with RTV
anyway. The protruding tubes align the flange with
the back plate.
-
Paul Lamar ...No rotor no motor.
The Rotary Engine NewsLetter. Powered by Linux.
ACRE NL web site.
http://www.rotaryeng.net
Copyright 1998-2006 All world wide rights reserved.