>>>> Yes it was leaking on the non JB Weld side. Big mistake
>>>> using that high temp epoxy I bought. I should have asked
>>>> Mazdatrix what they used for p-ports and they would have
>>>> told me JB Weld as they did later.
>>>> OK it worked great. It is like working on someones teeth however.
>>>> You need a small inspection mirror and a small pencil flash light
>>>> that will lie in the bottom of the tube. I glued a small
>>>> section of 1/4 inch dowel about 3/16 long to a small wood tongue
>>>> depressor to apply the small gob of JB Weld to the leaking
>>>> area. The vac pump pulled in the JB Weld.
>>>> If you want belt and suspenders on
>>>> this Burns stainless has 321 SS 1.875" OD tubing with
>>>> a .035" wall. Cut the SS tubing just long enough to go
>>>> up to where trochoid wear surface starts but not beyond.
>>>> Coat it with a very thin layer of JB Weld and insert it into the
>>>> aluminum tube. I have some inquires out for even thinner
>>>> wall SS tube. On the order of .015" to .020". I think I will
>>>> do this with Marks engine.
>>>> Best to just pressurize these tubes to 50 psi before you assemble
>>>> the engine to check for pin hole leaks.
>>>> BTW one advantage of the P-port is you can visually inspect
>>>> the trochoid wear surface with a flashlight and a small
>>>> inspection
>>>> mirror in the compression chamber area.
>>>> Paul Lamar
>>>> Well, one of my concerns over this approach is definitely
>>>> longevity of
>>>> the repair. I have no doubt that the current leak is fixed by the
>>>> JBWeld sucked into the crack(s). I have more concern over what
>>>> will
>>>> happen given future heating / cooling cycles.
>>>> One of the assumptions we've been operating under is that the first
>>>> failure was caused by residual water in the water jacket freezing
>>>> over
>>>> winter, expanding the tension bolts, & failing one of the
>>>> combustion
>>>> o-rings. Yet, on tear down we saw no evidence of this -- in fact
>>>> I still
>>>> have all the original combustion o-rings & they are pristine. I
>>>> submit
>>>> what actually happened is that the "bad" epoxy was coolant-soaked
>>>> during
>>>> the dyno runs. This then froze, failing the epoxy in a big way
>>>> such
>>>> that when I went to refill the engine with coolant, splish-
>>>> splash it
>>>> ended up in a puddle on the floor.
>>>> So - given this scenario I worry about both the heat/cool cycles
>>>> from
>>>> running the engine, as well as freeze/thaw cycles from the upcoming
>>>> winter. Because the existing repair technique can only fix fully
>>>> failed
>>>> cracks (such that the vacuum can draw in JBWeld) there still seems
>>>> to be
>>>> a big risk for future failures -- areas where the old epoxy has not
>>>>
*yet* failed. The scenario above is still very much in play, and
>>>> thus I
>>>> would expect future failures due to heating / cooling.
>>>> I suppose a sleeve inside the existing P Port could in some ways
>>>> address
>>>> this. But this scenario counts on a very small (and perfect)
>>>> ring of
>>>> JBWeld holding regardless of the leaks which may or may not develop
>>>> behind it. It also counts on the JBWeld to prevent the sleeve from
>>>> being ingested into the rotor - not a pretty thought!
>>>> Mark
>>>> That is a possible scenario.
>>>> Not to worry about the sleeve moving Mark. The sleeve is so long
>>>> the
>>>> epoxy will keep it in place. Also there is no force applied
>>>> to the sleeve.
>>>> The next thing to do to ease every bodies mind on this subject
>>>> it to make a sample. Boil it in anti freeze solution and place it
>>>> in the freezer and do it repeatedly.
>>>> Many P-port engines have been built over the past 30 years with
>>>> different epoxies and different methods of installing the tubes.
>>>> I have never heard of a seal failure but then most people don't
>>>> store
>>>> them in an unheated place with pure water in them either. I think
>>>> the guys at Mazdatrix would have mentioned it as well.
>>>> Jim and Dave have you ever heard of a leaking or failed P-port?
>>>> What ever you want to do Mark. We will take the engine apart and
>>>> replace the white epoxy with JB Weld if you wish. I think
>>>> the thin SS sleeve is still a good idea as it is easy to do
>>>> unlike a press fit.
>>>> Paul Lamar ...No rotor no motor.
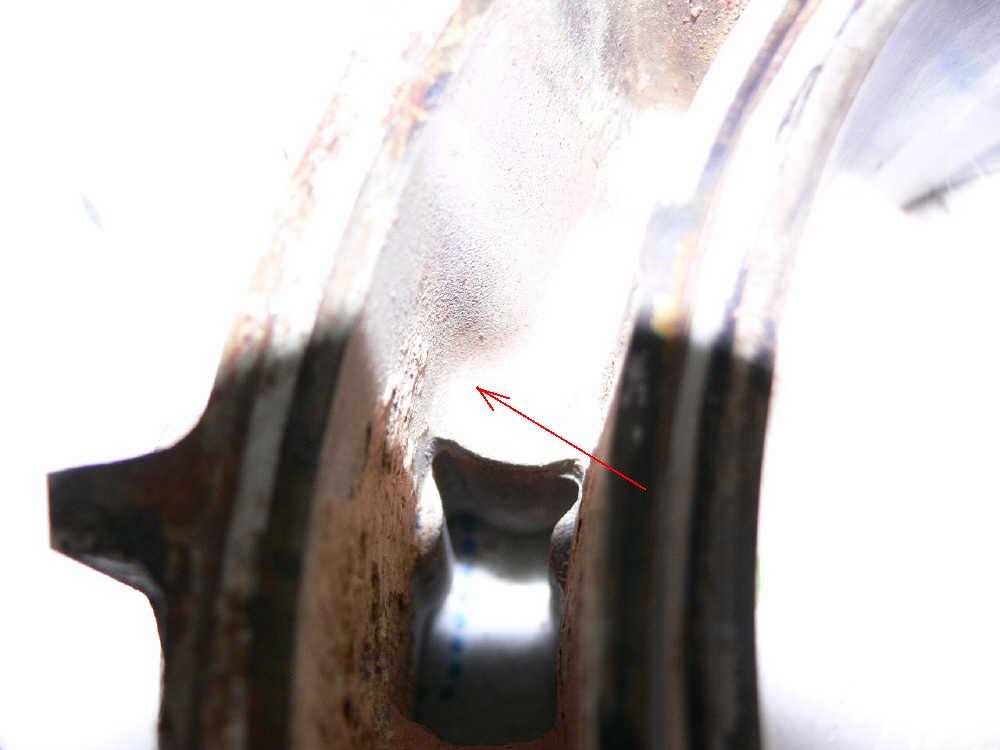
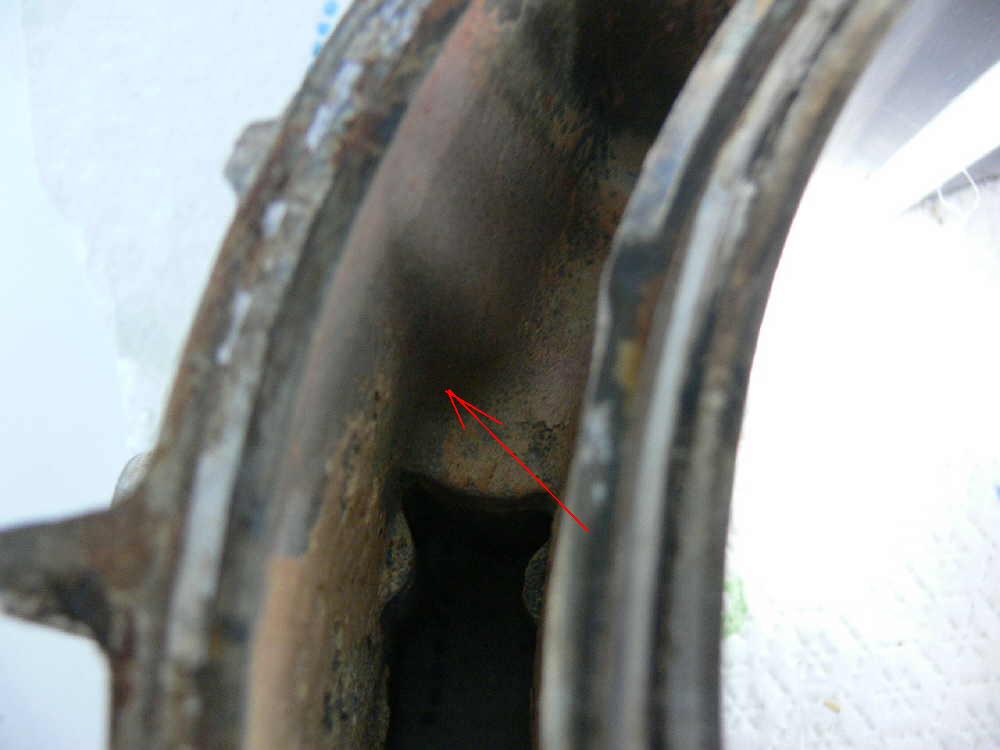
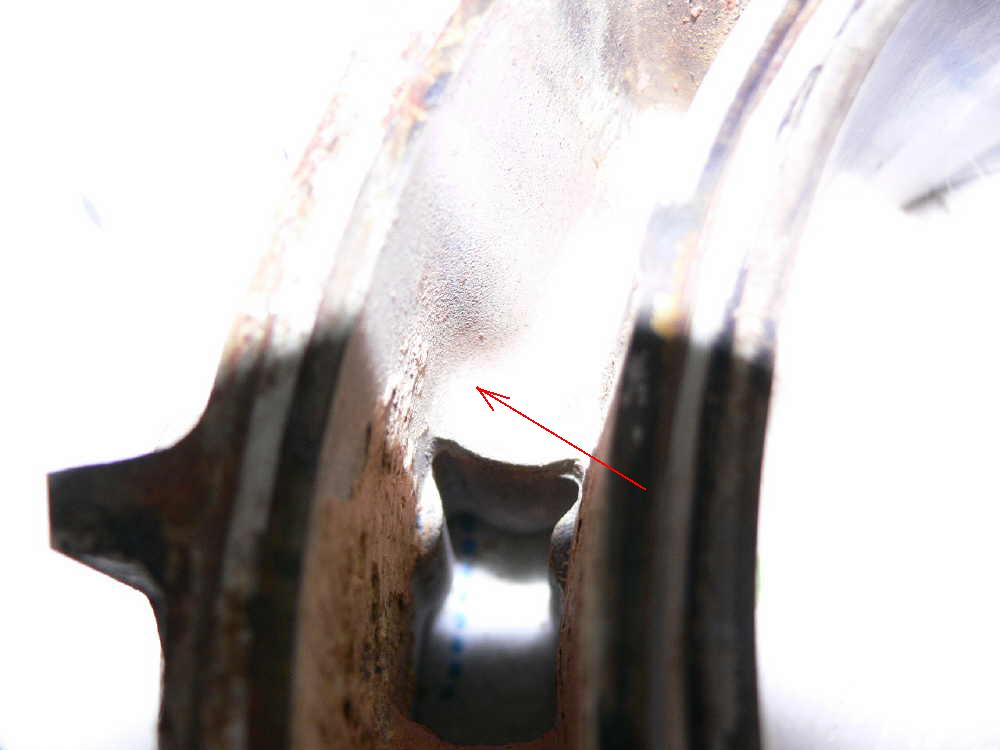
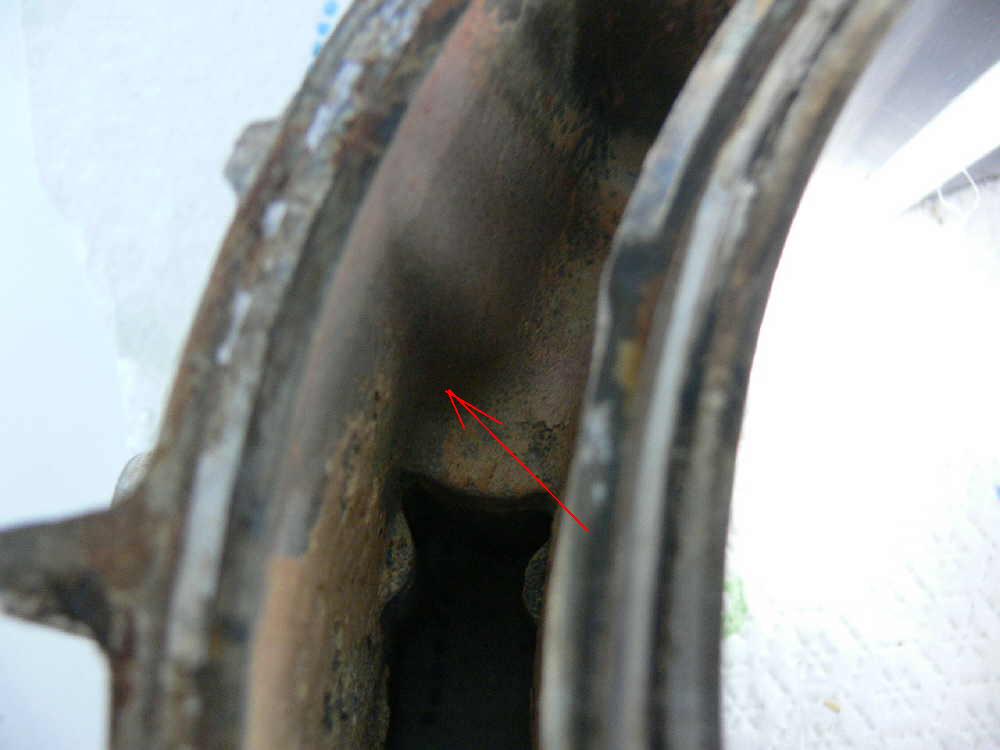
>>>> Here is where it was leaking. Gap in the aluminum filled
>>>> with the white epoxy. Right where Jerry said it would.
>>>> That is why the thin SS sleeve will help greatly.
>>>> I can cut it off at an angle to rougly match the
>>>> throchoid wear surface contour. It will then be a rather
>>>> wide bond area.
>>>> Paul Lamar ...No rotor no motor.
>>> Has anyone tried tig welding the tube at both ends to the
>>> housing ? By
>>> pulling the trimed tube out from the housing about 2 or 3 mm and
>>> laying
>>> a very small stitch weld there - only 5 mm or so at a time so the
>>> housing does not get hot beyond the local area. the outside weld
>>> would
>>> not need as much care, maybe 10 mm at a time, Any thoughts ?
>>> -dave
>>> Real risky as the trochoid end is a mix of steel and aluminum.
>>> I think everybody agrees. It is not a strength issue. They
>>> seem to be concerned with the hot coolant effects on the JB Weld
>>> as far as leaks are concerned.
>>> Paul Lamar ...No rotor no motor.
>> I like the sleeve as a fix. However, I don't think its a model for
>> future construction. What is objection to just installing the
>> insert all the way through? Its clean and simple. And, I think,
>> eliminates all the insert leaking problems. If the slide throttle
>> flanges could be round, we could build the entire insert at the
>> lathe, no welding at all. There would be a low stop collar so that
>> the insert butts up the same depth each time during the fitting,
>> trimming and gluing phase and a wide collar at the outboard end that
>> would be the slide throttle flange. That would be a fun project.
>> Sure there would be $30.00 + worth of chips per insert needing to be
>> swept but who cares. It would be such a strong, neat looking,
>> functional part. Jerry
>> ------------------------------------------------------
>> The sleeve is an additional labyrinth seal. The water has to
>> turn a couple of corners. If you bore all the way through
>> you still have a simple leakage path.
>> Hard to fix too. The thin SS sleeve cost less
>> than $10 and there is no precision about it. Also there is no
>> question about epoxy sticking to stainless steel. Way back
>> in the early 1960's we made composite chassis race cars
>> with SS reinforcements for bolt holes. We used SS
>> because epoxy stuck to it better than aluminum.
>> We also built some bonded aluminum chassis and we either
>> anodized the parts first or etched them with some sort
>> of solution I forget which. We were looking for maximum
>> strength in the bond. I'll research that etching fluid shortly.
>> This was long before Burt Rutan.
>> Starting with four inch round and cutting most of the
>> material off on the lathe leaving a flange is not practical.
>> You need to weld a flange on the tube. You need the flange
>> so you can take the engine apart. The original Teflon
>> slide throttle design can be made by anybody with just hand
>> tools and a modern saber saw. No lathe required. The hole in
>> the rotor housing must be done on a mill however I have heard
>> of people doing it with a hole saw.
>> --
>> Paul Lamar ...No rotor no motor.
>
>
> Jerry,
>
> Yes you explained an identical idea more simply. The whole insert
> could also
> be turned and bored on the lathe to save the welding step. My
> machinist is a
> great welder but hates to do it in this situation. Making the
> inserts out
> of bar stock could be done on a CNC in quantity and be repeatable
> and cost
> effective.
>
> Paul I hate to say and I mean this in the best interest of the
> whole rotary
> aircraft engine enthusiasts but doing it over might be the best way.
> Other inserts and techniques are just Band-Aids that may bring on
> other
> unknown side effects. It is not a cost issue. It is a piece of
> mind issue.
> With more planes flying with P-ports we will find ways of lowering
> costs
> latter.
>
> All the best
>
> Doug Fir
>
> P-ports like this have been used for 30 years in racing
> cars. Racing engines get far more abuse than you will ever
> find in an aircraft engine. 11,000 RPM 300 HP and constantly
> changing RPM with wide open throttle. Hellish temperatures.
>
> If I did do it over it would be essentially the same. A slip
> fit and JB weld. You and others are doing a good job of talking
> every body out of p-ports with absolutely no experience what so ever.
> It is all speculation on your part. We have a pin hole leak
> for @#%$^%&^& sakes. Get back to me when you have actually run
> a P-port engine.
>
> Here is what a guy said that actually built and ran a p-port engine.
> Richard Sohn
>
> "I can only say the best for JB weld. The inserts on my one rotor
> PP have been in there for about 3years with quite a bit of testing,
> lots of heat cycles and start and stop. Never had a leak. In addition,
> I am using JB-weld on the inside of the WP side housing for building
> up barriers between oil and water jackets. Never had one fail so far.
> Some of the applications I would not want in a flying engine, however,
> only because I would not feel good, not because of observed
> insufficiency.
> FWIW.
>
> Richard Sohn
> N-2071U "
>
> Richard's engine is far more complicated than anything we are
> trying to do with two piece end housings no less.
>
> Paul Lamar ...No rotor no motor.
I want to go on record as saying I totally oppose any welding on the
housing. I think it is insane. Secondly, there is nothing I have
seen proposed so far that cannot be done on manual lathes and mills
and with hand tools. No need to worry about CNC. There is nothing
wrong with building things one at a time, measuring accurately, going
slow, LEARNING all the while. There is no evidence what-so-ever
that converting rotary engines is going to be a profitable business.
Forget about that, please. That is not our game. It is irrelevant
that what we are doing is "cost effective" or not. This is a hobby,
a past time, and a passion. It's fun. There is nothing about the
P Port that is exotic or difficult. We are inventing nothing. It
has all been done a thousand times before. That includes gluing in
inserts. Jerry
Right on Jerry.
I just came up with an idea that eliminates the small hole.
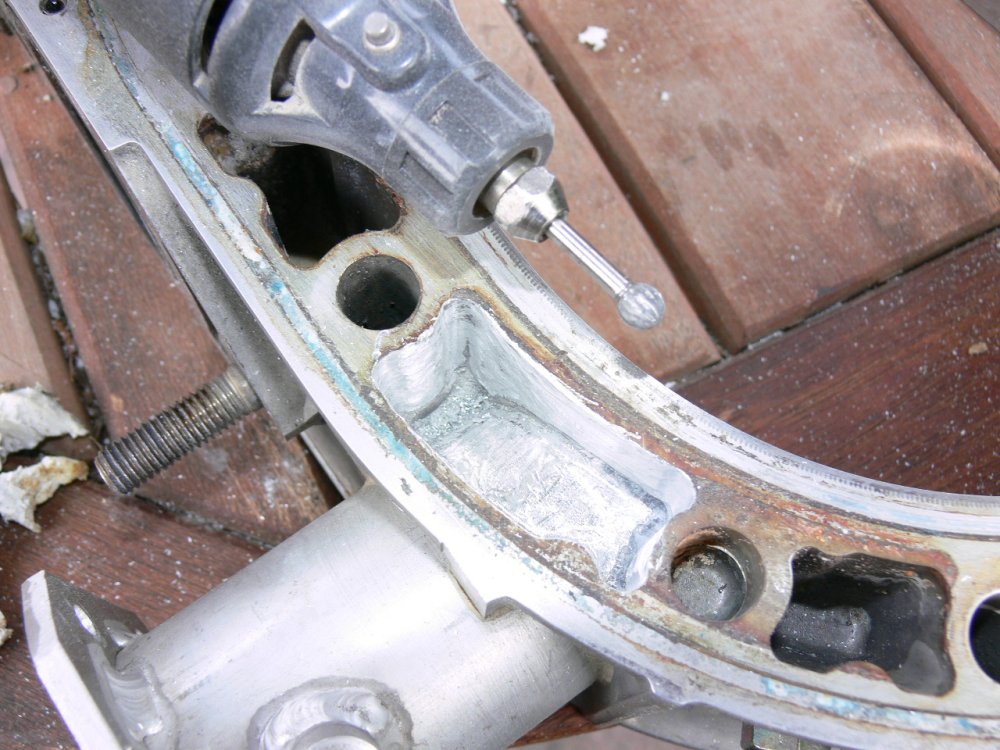
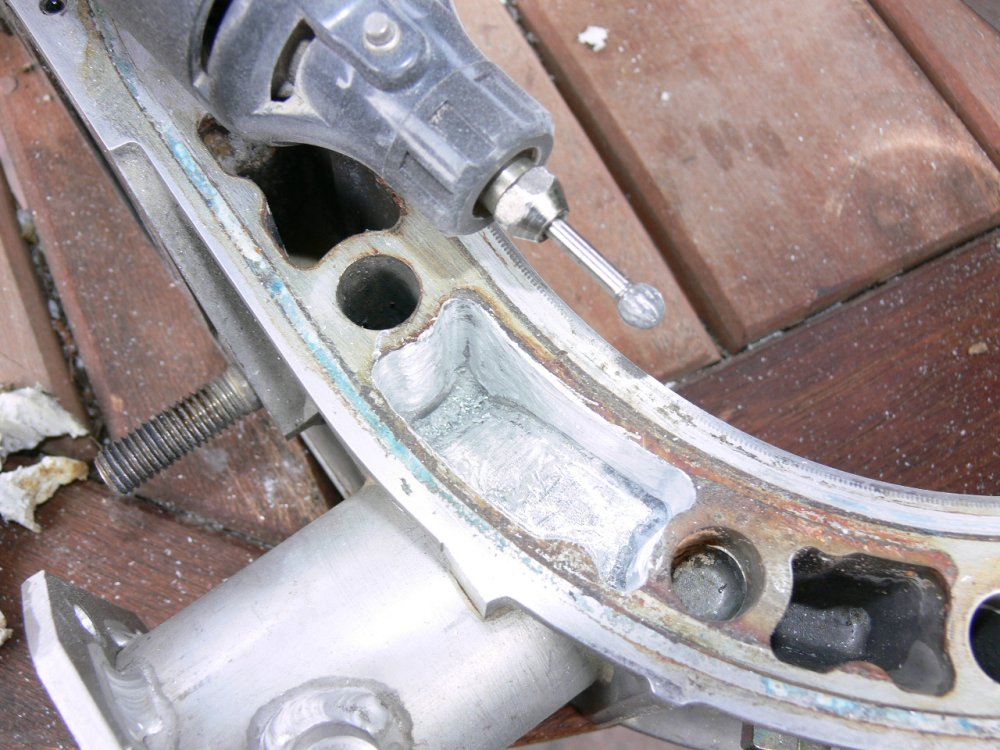
Here are a couple of pictures of the problem area.
This is the other side of the rotor housing from that
side I repotted on Marks engine.
Just clean this area up with a die grinder and hand cut
a chunk of aluminum that just slips in. Bond it in with
JB Weld BEFORE you cut the hole for the tube. Problem solved.
It won't help Marks engine but the Stainless steel sleeve
will do the same thing.
--
Paul Lamar ...No rotor no motor.
----------------------------------------------------------------------------------------------------------------------
As a possable solution to Marks concern and the possability of the tube
being sucked into the engine , Could you not stop a full diameter bore
just beyond the h2o jacket on the top end of the bore but just short of
the actual liner. This should keep the SS tube from ever being able to
move inward but at the same time adds extra surface area to the repair
for bonding and potential h20 leaks.
If the SS tube is deemed necesarry for future bores( as a fail safe) it
to could be bored inplace and epoxied after the aluminum tube has been
potted and cured ??????????
Geir
I can't quite picture this. Can you do a sketch in MS Paint?
--
Paul Lamar ...No rotor no motor.
The Rotary Engine NewsLetter. Powered by Linux.
ACRE NL web site.
http://www.rotaryeng.net
Copyright 1998-2006 All world wide rights reserved.