> > > Getting ready to bond the tubes into the housings. Do I block one side
> > > with modeling clay, pour the heated JBweld into the other cavity, bolt
> > > up the block off plates and apply pressure? Then I remove the clay
> > > after cure and do the other side? How long does the pressure need to be
> > > applied? What attitude should the housing be in during cure? I plan to
> > > alodine both the tube and the housing prior to bonding. Thanks
> > >
> > > Joe Berki
> > > LimoEZ
> > >
> > > Use a Dremel tool to clean the inside of the rotor housing down to
> > > the bare aluminum.
> > > The first JB Weld go around is to plug the areas between the upper and
> > lower chambers
> > > so don't apply pressure or it will blow out the modeling clay. Use a
> > minimum
> > > of JB Weld and don't thin it or heat it. It is just
> > > plugging up the big holes that would otherwise allow the JB Weld ooze
> > through
> > > to the bottom chamber. The rotor housings is laying on its side.
> > >
> > > Re prep the aluminum after every cure as it is only good for a few
> hours.
> > >
> > > The second go around you fill the chamber about half way and use thinned
> > (half
> > > teaspoon of acetone) and heated JB Weld and apply 40 psi pressure (Use
> the
> > part of the
> > > inner tube that has the valve bonded in. Not like the picture.) briefly
> > until you see
> > > the JB Weld ooze out between the tube and the housings both inside and
> out
> > side.
> > >
> > > After that cures in 24 hours apply pressure again and check that it
> holds
> > > 40 to 60 psi over night. If it does you are done. If not put some more
> > thinned JB
> > > Weld in and repeat the pressure treatment. It takes a couple of days to
> do
> > this so
> > > do two at a time. This is for one side of the rotor housing only. Turn
> > them over
> > > and do the other side.
> > >
> > > Best to practice on junk rotor housings.
> > >
> > >
> > > Paul Lamar ...No rotor no motor.
> > >
> > >
> > >
> > > why not just fill that entire area with J-B weld first?
> > > then drill the p-port hole thru the j-b weld
> > > and the housing all at the same time.
> > >
> > > I think that would be alot easier
> > >
> > > Tony
> > > How would you pressure test it for coolant leaks?
> > >
> > > --
> > > Paul Lamar ...No rotor no motor.
> >
> >
> >
> > I have alodined just about every aluminum part in my AC and thought that
> it
> > provided protection for the aluminum for a long time. I realize that
> > etching is very short term but you do that as part of the alodine process.
> > I think we need to do some more research on alodining.
> >
> > Joe Berki
> >
> > Well cut a couple of alodined .032 thick aluminum parts and bond them
> together with JB Weld.
> > I did that with plain aluminum and etched aluminum and then did the
> bending test. There was
> > a world of difference in the strength of the bond.
> >
> > Paul Lamar
>
>
> What would happen if you packed one side full of clay and placed the
> blockoff plates on either side and pressurize the first pour performed from
> the oposite side? Wouldn't the clay be trapped between the tube and the
> plate? Just try to get a homogenous plug here. The remove the clay and
> presurrize from that side.
>
> Joe Berki
>
> Yes I think that would work. But you never know. the clay might contaminate
> something. You may not need the clay. As I recall the gaps
> are minimal. Try it with out the clay with unheated and un-thinned JB Weld.
> Start with the small cavity side. Here are some more close up pictures. The "walls"
> will probably contain the JB Weld.
> --
> Paul Lamar ...No rotor no motor.
Like I said before "why not just fill the thing, with J.B. weld first then drill the hole"?
Tony
As I said before :)
"How would you pressure test it for coolant leaks?"
Did you not see this question? :)
Paul Lamar ...No rotor no motor.
Forgive my ignorance but what would leak if you drilled thru a solid block of J.B. weld?
Tony
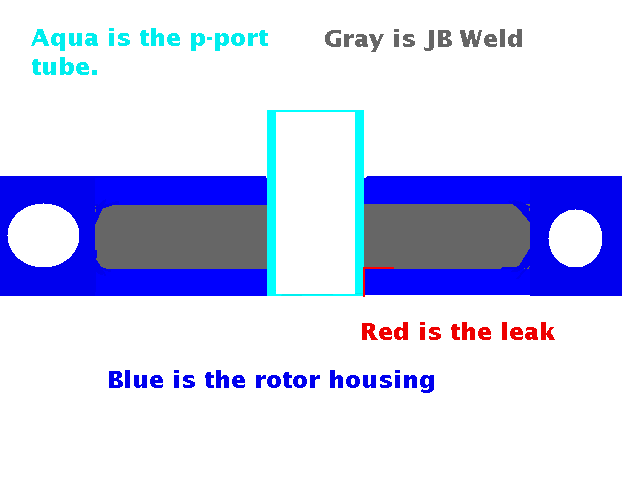
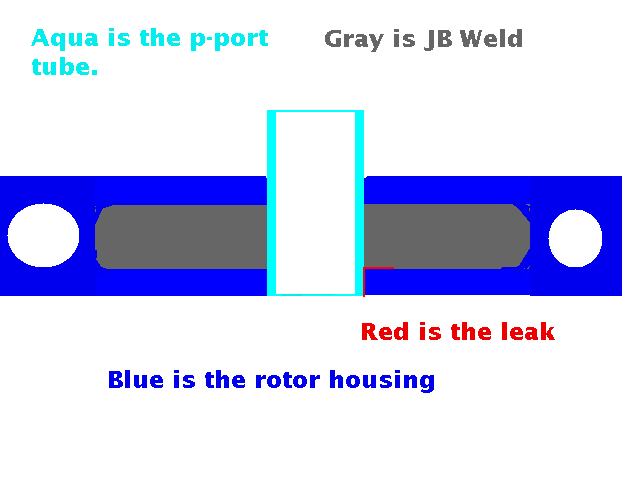
The leak might occur between the block of JB Weld and the aluminum housing.
Here is a sketch. There is no way to test for this ahead of time as far
as I can see. Once it is set up the only way to fix it is mill it all
out and start over. Been there done that. Remember the pressure in the water jacket
can be up to about 30 psi. At closed throttle with the prop driving the engine
the pressure can be below atmospheric in the intake manifold
of up to - 15 PSI. That is a grand total of 45 psi difference between the water
jacket and the intake manifold.
--
Paul Lamar ...No rotor no motor.
The Rotary Engine NewsLetter. Powered by Linux.
ACRE NL web site.
http://www.rotaryeng.net
Copyright 1998-2006 All world wide rights reserved.