Jay,
The 20B utilizes a split shaft. You're going to have to separate it in
order to disassemble the engine. Bob Darrah built a splitter tool from a
threaded shaft and a 1" thick bar of steel. The threaded shaft will need
to
match the threads in the #1 lobe on the crank, 18mm if I recall
correctly.
Thread the shaft into the lobe, slide the 1" bar over the other end of
the
threaded shaft until it fits snug against the nose of the eccentric, put
a
nut on the threaded shaft to tighten it all down. You may want to use a
soft aluminum or brass spacer so you don't bugger up the end of the
eccentric. Tighten the nut until it cocks the 1" bar a little, then tap
the
other end of the bar with a hammer and it should come right apart, at
least
that's how it has worked for me twice. Now you can finish disassembling
the
engine. Remember the sequence for when you are ready to re-assemble it.
Mark S.
Mark--do you have a photograph of the 3-rotor eccentric separation tool
installed on the eccentric?
Steve Beckham
Steve,
Yes, see the last picture in the group. The TR (threaded rod) screws
into
female threads in the #1 lobe (the removable one).
I should have mentioned that the picture doesn't show the BN (big nut)
that gets threaded onto the other end of the TR. The purpose of the BN
is
to lock the BB (big bar) down against the end of the e-shaft. I
recommend
you put a piece of softer material (like aluminum or brass) between the
BB
and the e-shaft to keep from damaging the threads.
Once it is assembled, you take a BH (big hammer) and smack the
unsupported
end of the BB. The #1 lobe should pop right off.
Mark S.
I'm having a heck of a time finding an 18mm bolt with 1.5mm pitch long
enough to use on getting the E shaft split. Looks like I'll be
fabricating/jury rigging/welding something.
Jay
Welding. Not all bad. The loads are not that high.
Paul Lamar
Jay,
That's the problem I encountered. As I stated earlier, the one shown in
the
picture was built by my machinist friend Bob Darrah. If you take a
close
look at the threaded rod, you can see that he turned down the larger
diameter and threaded it for 18mm.
Being a welder (not a machinist) I had planned on welding a bolt to a
threaded rod. Paul's correct, the loads aren't that great.
Also, make the hole in the BB a little oversize so it can move a little.
Mark S.
Tiffany Perez
Spahr Metric, Inc.
421 McGhee Road
Winchester, VA 22603
PH: 540-678-3815 Ext 101
Fax : 540-678-3819
I just ordered an 18 x 1.5 mm threaded rod from the company above. It's
three times the length I need but it's only $22. I thought I'd mention
it
in
case any one else was looking for parts to separate the E shaft
extension
with. They have access to shorter bolts of that size but you have to buy
a
box quantity.
Jay
Jay,
Good info on the 18mm all-thread. Hope you ordered a couple of 18mm nuts
too.
Do you have a chunk of 1" thick bar stock? It should be approx. 10-12" x
3". You'll also need a drill press (or torch) to drill/cut a big hole in
the 1" bar stock.
Mark S.
Mark,
Yes I got nuts to go with the rod and I also have a piece of steel
channel
stock. I thought it might be as stiff as a thicker piece of rectangle
stock.
I already drilled a slightly over size hole in it, with a $20 drill bit
I'll
probably never use again.
Jay
Jay,
If you were local, I would loan you this one. On the brighter side, now
you'll have your own puller, just in case you ever need to go through your
engine in the future. Let's hope you never need to use it again. Good
luck!
Mark
Slightly off topic question.
With this email newsletter format, is there any kind of archive that someone
could search through, rather than asking questions that some of you more
knowledgeable guys may be getting tired of answering?
Jay
Other than the web site nothing. I don't mind as things change and we are
constantly getting new readers. For new readers please read the entire web
site first and then ask questions. I notice some people don't read the web
site.
Not you Jay :) We don't have anything on overhauls other than a link to the
shop manuals. Unfortunately there is no english shop manual on the 20B that
I know about. Videos yes but no printed 20B shop manuals. After a 11 years
I am still learning. I have a 20B but it has not been disassembled.
If I get some questions that are not covered by the web site I will update
the web site. I average some kind of update about once a week. Some times
it is just to add stuff to the for sale section.
Paul Lamar
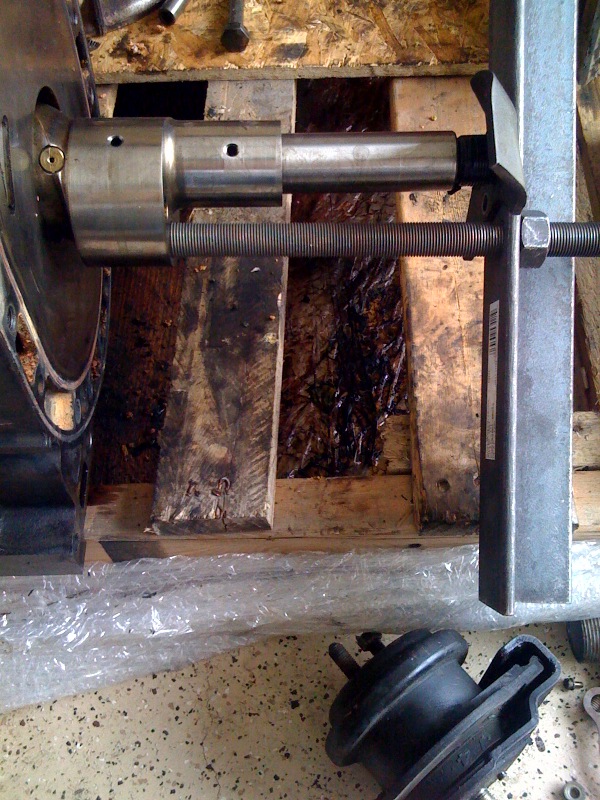
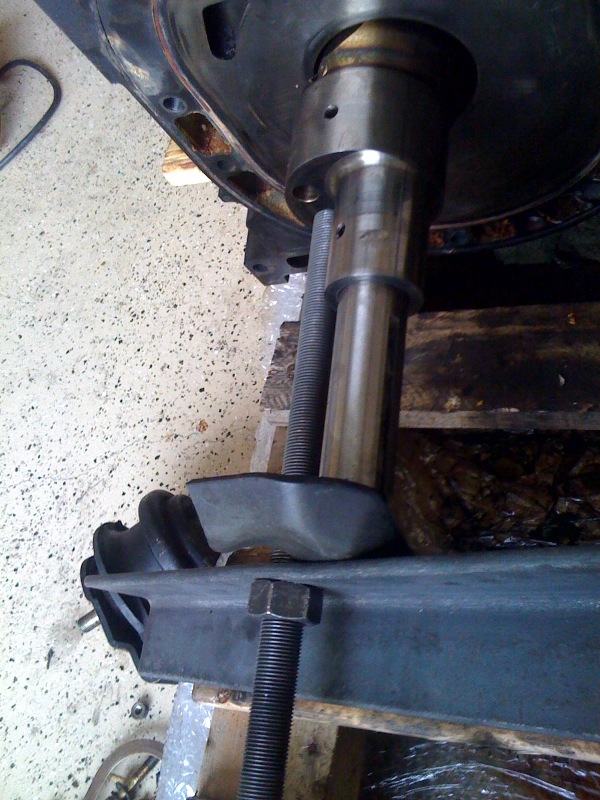
I'm still trying to get the 20B E shaft extension apart.
I have pretty much all the torque I can get on the nut with no results.
I attached some photos, does it look like I'm doing this correctly?
I want to make sure before I put a pipe(for leverage) onto the wrench I'm
torqueing the nut with.
The black piece between the big bar and the end of the shaft is there just
to protect the threads and spread the load.
Jay
I would take the rubber out of there and replace the large screw in the end of the
e-shaft to protect it. Take up the tension again and smack the iron angle with a hammer.
The shock should cause the e-shaft to vibrate and come apart.
The angle iron might not be stiff enough to do this as the guys have been
using a bar of steel instead of angle iron.
Paul Lamar
--
The Rotary Engine NewsLetter. Powered by Linux.
ACRE NL web site.
http://www.rotaryeng.net
Youtube key word UTUBPLEASE
Copyright 1998-2009 All world wide rights reserved.